Work Hours
Monday to Friday: 8am – 6pm
Weekend: 10am – 2pm


In this chapter, we will focus how to release for production. I also have one fun fact about possibilities.
The simplest way to host is to place our app on the servers of the people who made Next.js. They offer hosting at very affordable prices.
When we’re ready to prepare our app for live use, we just use the command npm run build. This creates an optimized version. It processes JavaScript, combines files into bundles, and makes them smaller. So, we end up with a folder of improved files and a summary:
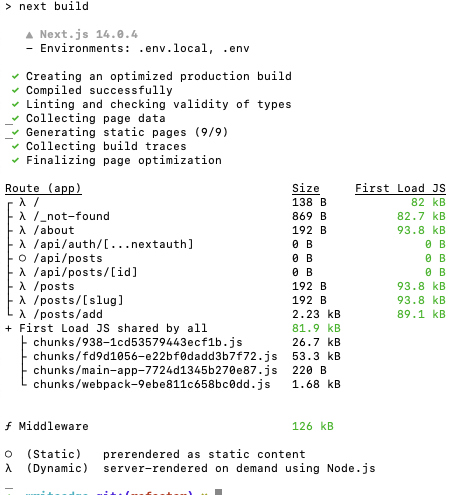
We have the ability to determine which files carry static and dynamic content within the page. It further provides information on the file sizes, including how large each file is upon initial loading. This gives us a clear path to assess what aspects of our page can be optimized for better performance and efficiency. By evaluating these details, we can make informed decisions on how to reduce load times and enhance the user experience.
Before a production build, it is good practice to pass the checklist. A good source of that is in documentation.
There are three methods for self-hosting a Next.js application.
The first method involves using a dedicated Node.js server, similar to how you would in a development setting.
The second method utilizes Docker, which is essentially the same as the first method but involves the use of virtualization through a hosting platform.
The third method is to create a static page. This means producing a page that works with any HTML server. However, this method comes with certain restrictions:
Configuration to have static page is simple, just add output ‘export’ inside next.config.js:
next.config.js:
/**
 * @type {import('next').NextConfig}
 */
const nextConfig = {
  output: 'export',

  // Optional: Change links `/me` -> `/me/` and emit `/me.html` -> `/me/index.html`
  // trailingSlash: true,

  // Optional: Prevent automatic `/me` -> `/me/`, instead preserve `href`
  // skipTrailingSlashRedirect: true,

  // Optional: Change the output directory `out` -> `dist`
  // distDir: 'dist',
}

module.exports = nextConfig
How to handle different problems with static export, there is of course documentation.
You are not limited by full server side to run Next.js application. I have succeed run it on ESP32 board.
Just create simple ESP32 HTTP server, like this:
#include <WiFi.h>
#include <AsyncTCP.h>
#include <ESPAsyncWebServer.h>
#include "FS.h"
#include <LittleFS.h>

#define FORMAT_LITTLEFS_IF_FAILED true

const char* ssid = "";
const char* password = "";

AsyncWebServer server(80);

void setup() {
  Serial.begin(115200);

  if (!LittleFS.begin(FORMAT_LITTLEFS_IF_FAILED)) {
    Serial.println("LittleFS Mount Failed");
    return;
  }

  WiFi.begin(ssid, password);
  while (WiFi.status() != WL_CONNECTED) {
    delay(1000);
    Serial.println("Connecting to WiFi..");
  }

  Serial.println(WiFi.localIP());

  server.on("/", HTTP_GET, [](AsyncWebServerRequest* request) {
    request->send(LittleFS, "/index.html", "text/html");
  });

  server.serveStatic("/", LittleFS, "/");

  server.begin();
}

void loop() {
  // put your main code here, to run repeatedly:
}
And put your compiled static export inside the data folder. After upload both firmware and data partitions, you can have Next.js page, hosted from ESP32 board.
Stan
The whole example project can be found here.
